
Thursday, October 29, 2009
Bookmark with Marbled paper
I have finally decided (somewhat =p) that my bookmark will have one side decorated with marbled papers and a stamped quotation. I have yet to decide what the other side will look like though. I was considering stamping a bear or a cute hedgehog from penny black on the back and colour the image. If I do that, there will be about 200 images to colour. That would take up quite some time, which I sorely lack. I am a little behind time on my work schedule and hopefully I can finish making all the marbled papers I need. I figured I will need about 70 sheets of the papers to cut into 200 bookmarks.

The size of the bookmark is bugging me somewhat. I would like it to be a quarter of an inch slimmer but that would mean stamping very close to the edge of the paper. I hate fiddling with the stamp positioner for 200 pieces of stamping, so it might be a hit and miss for some sheets unless I come up with some bright ideas on how to stamp right where I want with a very narrow margin. Anyone with suggestions?
Tuesday, October 27, 2009
Marbling Papers
I did marbling yesterday - lots of it!! I have a new stack of marbling papers and have just decided what to do with them. I plan to make bookmarks for all my students along with a crochet phone charm for their graduation gift this year. I will post pictures of that once I have a sample of it done. I have about a week or two to get that done. I will need a total of about 150 pieces made. It will probably have to be a simple design since I am still swamped with work.
I took a few photos of the marbling papers I made and decided to share them here. I am more or less a newbie at this, with no prior instruction. I am not in the area where there are marbling artists teaching classes so I have fumbled around for instructions online and found some sites that are helpful. I love the look of each marbled piece, how they are all unique.
The papers look rather wrinkled as they warp slightly when they dry and I have yet to have time to iron them flat before cutting them down to size for my projects.


The next two are part of my attempts to do floral designs. I still suck at it pretty much. The flowers look distorted and the leaves and stem look like plants that will only grow on another planet. I am thinking that the marbling base may not be thick enough for the manipulation. Will be trying a thicker formula next time. =)


I took a few photos of the marbling papers I made and decided to share them here. I am more or less a newbie at this, with no prior instruction. I am not in the area where there are marbling artists teaching classes so I have fumbled around for instructions online and found some sites that are helpful. I love the look of each marbled piece, how they are all unique.
The papers look rather wrinkled as they warp slightly when they dry and I have yet to have time to iron them flat before cutting them down to size for my projects.


The last 3 pictures show paper coasters that I marbled. I like the look of the paints on the coasters. They warped slightly during the drying process. Guess I will have to flatten them out under heavy books. I am thinking of making more of them for sale at a craft bazaar. Do you think they will sell?


I am hoping to complete the sample design by tomorrow before I mass produce all 150 pieces of the bookmark. I have a feeling I won't be sleeping much this weekend.
Friday, October 23, 2009
More Booties =)
I just finished another 3 pairs of booties. I like the simple look of the baby ballet slippers, as well as the dainty look of the one with the flowers on top. The tiny sneakers are just too cute. I may make one or more of these for my friend whose baby girl is due in Dec.


It would be great if the shop owner and I could come to an agreement and have me start supplying her store with the handmade baby booties. I love making them and using up my stash of yarn. I have too much yarn. At least a quarter of my crafting space is taken up by boxes and bags of yarn. I have yarn from most of my travels. I actually bought more than 4kg of yarn from Budapest last Dec. I had the intention of dyeing my own yarn and bought unbleached cotton yarn cones. They are now kept in a bag, waiting for the day when I have time to wind them into balls or skeins before dyeing them in my favourite colours. =)
Thursday, October 22, 2009
Booties =)
I was approached at last week's bazaar by a lady who is opening a shop selling baby items. She is planning to stock handmade baby items and asked if I was willing to do up a few samples of crochet booties. This is one I just completed after she sent the pattern over. It is such a darling design. I shall search for more suitable yarn and make a couple more pairs in other colours.


Tuesday, October 20, 2009
My Second Play with my Tombows
This is my second play with my Tombows. My first image was on thicker watercolour paper at my friend's place. The image has been mounted onto a card and sold at a fundraiser two weeks ago. I don't have a picture of it. I think the quality of the paper makes a huge difference in the final result of the colouring. This image that I stamped today on heavy cartridge paper just doesn't look at bright or smooth after I coloured and blended using a mixture of the blender pen or the waterbrush.

The paper seemed to be much weaker than the watercolour paper I used previously. I guess that is to be expected, even though the weight of the heavy cartridge paper is heavier at 200gsm, compared to the weight of the watercolour paper at 190gsm. I am guessing the finishing on the surface of the paper affects the blending of the colours.
The sky and grass are sponged using memento inks in Summer Sky, Green Sprout and Pear Tart. I made the 'clouds' using the edge of a punched scallop. I shall experiment a little more using other brands and weights of the watercolour papers for the best match with the markers. I love how they blended in my first image but the paper is the priciest I have ever bought so far. i hope I can find a more inexpensive alternative.

The sky and grass are sponged using memento inks in Summer Sky, Green Sprout and Pear Tart. I made the 'clouds' using the edge of a punched scallop. I shall experiment a little more using other brands and weights of the watercolour papers for the best match with the markers. I love how they blended in my first image but the paper is the priciest I have ever bought so far. i hope I can find a more inexpensive alternative.
Friday, October 16, 2009
Christmas Cards - using scrapbooking kit
I bought an 8 x 8 scrapbooking kit when I went shopping last week. There are cardstock, designer paper and die-cuts in the kit. I have never done anything using a kit before so I decided to give it a go. There were 8 pages of die-cut greetings and tags which I made I used for my card toppers. There was no stamping involved in all. It was quite a challenge for me not to stamp anything. I did do some inking and outlining with a Signo white gel pen for one of two of the cards.
I end up making 15 cards to fit into a box I made using Craft Companion's Top Score. This is the first time I am using the tool and I must say, it is very user-friendly. I only needed to figure out the size of the box I wanted and cut the paper accordingly. The lid of the box was made with paper of the same size. The tool automatically adjusts the size of the lid by about 2mm or so for a good snug fit over the base. 


I decorated the box cover by wrapping it with one of the designer paper I used in the cards. There was a frame left over from making the cards and a few pieces of the journalling tags and greetings so I layered those over the frame to complete the cover design. The ribbon I tied around the cover is an organza ribbon. I have tons of these cut for a previous project and they all hang on an S hook. I am trying hard to use up all the cut ribbon. =)
Now for the cards. I mixed and matched the designer paper and cardstock for the 4 x 4 cards. I cut the 8 x 8 papers into two, getting two cards per sheet of cardstock. There are enough for 30 cards. I kept the other 15 for another project. These are the 15 I came up with after playing around with the die-cuts from the kit.


In the first photo, the extreme left cards got a little cut off when I took the photos. The card base colours are red and deep olive green. The second photo showed a light cyan and light green cardstock. The last group of cards were made using a pale yellow/off white cardstock.
I am amazed at how fast I could finish all the 15 cards. It was all relatively easy. I spent more time mixing and matching than actually assembling the cards. Most of the elements on the cards are popped on foam tape to give some dimension.
I didn't have any 4 x 4 square envelopes and used the Craft Companion's envelope maker to make custom envelopes. It was also relatively easy and quick. The final thickness of the stack of cards and envelopes came up to just under 3 inches and so my box had to measure 4.5 x 4.5 x 3 inches.
i am quite happy with the effects of using ready-made elements such as the die-cuts to complete the cards. I may make more if I can find more bargains for small kits like this one.
Monday, October 12, 2009
Christmas Cards
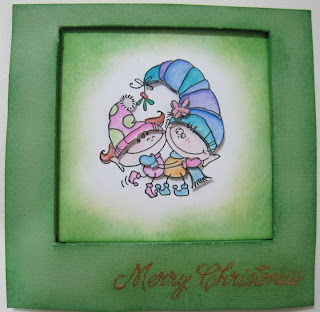
I just finished 2 cards for a shop competition. Not sure if I should be posting this before I actually submit the entries but I suppose it shouldn't hurt. The first one is a recessed window card with the main image layered in paper tole style. There are a total of 3 raised layers on the image. The recessed window technique is perfect for this type of layering as the main image will be somewhat protected by the frame on the outside. With the 2 close up photos, you can see the layers more clearly, as well as the glitter on the small elements to bling up the card a little. The greeting on the front was heat embossed with gold embossing powder. The colour of the card base coupled with the lighting when I was taking the photo doesn't seem to show the greeting clearly.


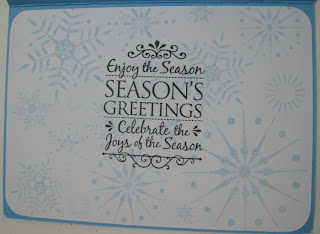


The second card is much simpler, with background stamping using versamark and white brilliance ink. The main image is a cute kitty from penny black. The round sentiment on the card front as well as the one on the inside are both from Hero Arts. I added glitter on the ornament though the camera did not pick up the glitter. It makes the ornament look very pretty IRL. =)


The reason why I chose to attach almost a whole sheet of insert with the stamped background and greeting is due to the thin cardstock I was using for the card base. It was cardstock from a 12 by 12 pad of scrapbooking paper. I have tried and did not like the cardstock from that brand. Neither did I like the other brand I have tried so far - American Crafts. They are both too thin for my preference for card bases.
Which of the two do you like better?
Saturday, October 10, 2009
Christmas Card-making Class
I just finished the first round of Christmas Card-making workshop for this year. The participants completed these 4 cards. They are designed more for the basic or starter stamper in mind.


The techniques include using versamark to create watermarks, sponging, popping elements up to create dimension, spotlighting using a strip as well as making use of designer paper in card-making.
I will be running a second round of this workshop on 24 Oct in the morning. If you are keen to sign up for this workshop, do drop me a comment and I will get back to you with the details. I will also be having a Basics I Rubber Stamping workshop in the afternoon on the same day, where we will be covering several techniques. Participants of my technique classes will all be given technique pages so that you can keep notes for your reference after the workshop.


I will be running a second round of this workshop on 24 Oct in the morning. If you are keen to sign up for this workshop, do drop me a comment and I will get back to you with the details. I will also be having a Basics I Rubber Stamping workshop in the afternoon on the same day, where we will be covering several techniques. Participants of my technique classes will all be given technique pages so that you can keep notes for your reference after the workshop.
Friday, October 9, 2009
Tombow Markers Chart
I completed this colour chart two weeks ago. The template was sent to me by a friend who also bought the set of Tombow markers. We did not manage to get the full set of markers though. I think I managed to buy 103 out of the 144 colours.
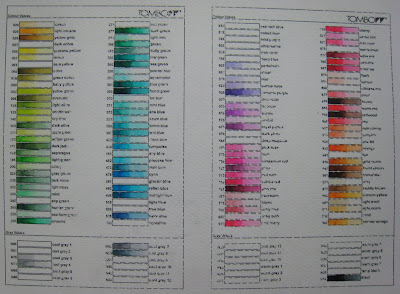
The colours blended very well on the watercolour paper I used. This is a fairly light weight watercolour paper at 180gsm. I will be making another chart on white paper. This one is off-white or cream in colour so the colours are going to be slightly different from how they appear on white paper.
In any case, if there are any of you out there who would like to have this chart, do leave me a comment with your email address. I can send the document to you. I also have the latest one with the summer collection for Twinkling H2Os. That one will need more time to colour in as I am swamped with work this weekend.
Thursday, October 8, 2009
New Tombow Markers and an old postcard
I finally finished the crochet penholder I wanted to make to hold my new Tombow markers. It is a little loose right now, as I am still short of about 30 markers from the complete set of 144 markers. Hopefully, the shop that is carrying them will replenish their stock soon. Here's a picture of it.

I used double strands of an acrylic yarn for the holder so it is thick and pretty sturdy. I have tried the markers on different types of watercolour paper and found that it is rather strange that it tends to blend beautifully on some papers but not well at all on some. Generally, I have found that it blends better on thinner watercolour paper. When I tried it on 300 gsm paper (approx 140lbs), I could not get it to blend at all. Will be doing some more tests to figure out which ones work best with these markers.
As for the old postcard, I found one I completed a few months ago. I like the image very much. Think I will change the colour of the cat the next time I colour the same image though. It looks too close to the colour of the pot it is standing on in my opinion.

The image is coloured using Swiss Colours watercolour pencils. They blend pretty well. I will be breaking out my new Derwent pencils soon, as soon as I complete the colour chart for it. I love the intensity of the Derwent pencils. My Swiss Colours will be somewhat retired once I use my new pencils I think. They will probably be used for my workshops.
Speaking of which, I have a confirmed class this Sat at 1:30pm. There are still vacancies, so if anyone in Singapore is keen, you can just drop me a comment with your email contact and I will provide you with more details.
Monday, October 5, 2009
My First Post Here =)
I am transferring my blog from livejournal and this is my first post here. I shall see about transferring stuff from my previous blog after I have figured how to do that.
For my first post here, I am going to put up photos of the items I have just completed over last week.
First are the tags I stamped and coloured and finally taken a photo of. I stamped and coloured them a few weeks ago, not decided what to do with them really. I took a photo of them on Thu and here they are:


Two of the images are from penny black, the flower image from Imaginence and the lovebirds from a purchase I made while I was in Taiwan. I coloured them using SwissColor watercolour pencils. The images were stamped on 180gsm or roughly 80lb watercolour paper. It is pretty lightweight as far as watercolour papers go. I did not require very extensive blending for the images and thought a lighter weight paper would do just fine. I then used Spellbinders dies (the labels series) to cut out the tags.
These will probably end up as card toppers or tags when I finally decide what to do with them.
I finished these sets of 3 x 3 notecards on Sat and took photos of them after I was done. I am thinking of giving them to friends or putting up for sale on Etsy. They are all blank inside and I found matching envelopes for them as well.


The first set is for generic uses, such as leaving a small thank you note. The two other sets are for the Christmas season. I love making these small notecards. I had a bunch of the card bases cut and decorated with designer paper already. All I need to do next is to stamp and mount all the images I have selected. I am thinking if I should make small boxes to hold them or to make the mini magazine holders for them. Any suggestions?
That's all for now. I just saw an announcement for a Design Team callout over at Splitcoast Stampers. I shall colour up some images and see if I can apply for it. Though I have been making cards for years, I have never applied to be on any Design Team before. There aren't many that are looking for designers outside of the US. Hopefully that will change soon as I really enjoy working with stamps and colouring mediums.
I am looking to complete the set of samples I coloured using Copics on loan from a friend. Will post that up as soon as they are ready.
Subscribe to:
Posts (Atom)